Creating amazing prints with a laser printer can elevate your projects to a new level of professionalism. Laser printers are known for their speed and high-quality output, making them a favorite among professionals and enthusiasts alike.
This guide will walk you through every detail of the process, from understanding how these printers operate, to tips on how to create stunning prints using a laser printer.
Understanding How Laser Printers Work
A laser printer uses a focused beam of light to transfer an image onto paper. The process begins when the printer’s laser scans across a rotating drum, creating a static electrical charge in the areas that correspond to the image being printed.
Toner, a fine powder, is then attracted to these charged areas. When the paper moves through the printer, high heat binds the toner to its surface, resulting in sharp, vibrant prints.
This technology is particularly suited for producing high-quality documents and graphics with detail.
Materials You Will Need
To achieve stunning prints, gather the following materials:
- Laser Printer: Select a printer that fulfills your needs, preferably one with high resolution.
- Toner Cartridges: Ensure you have quality cartridges compatible with your printer.
- Paper: Pick paper specifically designed for laser printers, such as glossy, matte, or cardstock.
- Design Software: Utilize programs like Adobe Illustrator, Canva, or Photoshop for your designs.
- Calibration Tools: Consider using color calibration tools to maintain color accuracy.
Step-by-Step Guide for Laser Printing
1. Design Your Print
Begin the process by creating a design that reflects your vision. Use design software to craft or modify images:
- Set Resolution: The canvas should be set to 300 DPI (dots per inch) to ensure high-quality prints. This resolution is vital for clarity, especially for detailed graphics or images.
- Choose Color Mode: For best results, use the CMYK color mode, as this aligns with printing processes and helps capture the true colors of your design when printed.
2. Choose Your Paper
Selecting the right paper is crucial as it significantly affects the print’s overall quality:
- Glossy Paper: This type is ideal for photographs or colorful artwork, enhancing vibrancy and sharpness. Glossy paper often has a shiny finish, which can help colors pop and gives a more professional appearance.
- Matte Paper: Provides a softer and more elegant look. It is particularly well-suited for text-heavy documents or designs where readability is critical, as it reduces glare.
- Cardstock: Thicker paper is great for items like business cards and invitations, adding substance and a premium feel. Ensure you check your printer’s specifications since thicker media can require adjustments to settings.
3. Set Up Your Printer
A well-prepared printer is key to achieving optimal performance:
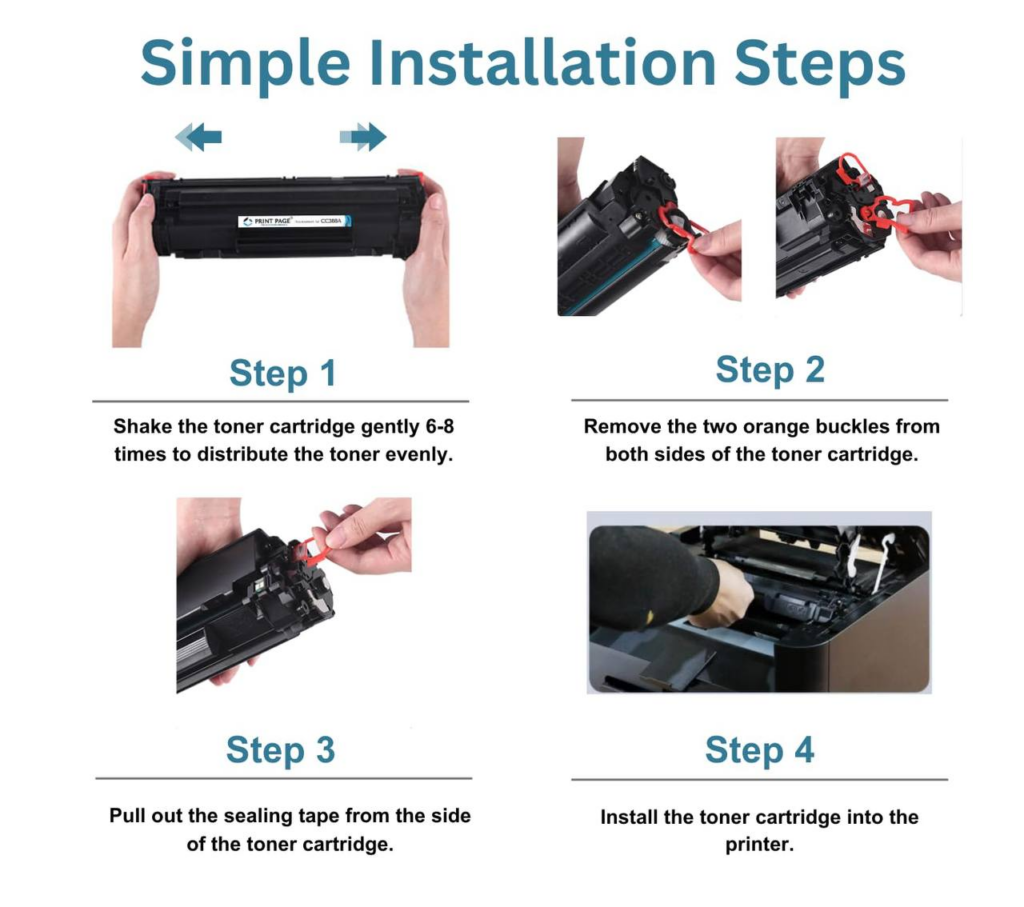
- Install Toner Cartridges: Follow the manufacturer’s instructions closely. Ensure each cartridge is installed in the correct slot and give them a gentle shake to evenly distribute the toner. Proper installation prevents issues like streaking or fading.
- Load Paper: Adjust the paper guides in the tray to match the size of the paper you’re using. Maintain a suitable stack height to avoid jams and ensure that the paper is fed seamlessly during printing.
4. Adjust Printer Settings
Before printing, take the time to navigate through the printer settings:
- Open the Print Dialog: In your design software, click on ‘Print’. Make sure that your laser printer is selected.
- Select Paper Size and Type: Ensure the software settings match the physical paper size you’re using. This provides a proper fit for your designs and avoids unpleasant surprises.
- Quality Settings: Opt for a high-quality output. Most printers offer a ‘Best’ or ‘High Quality’ option for this purpose, capturing intricate details and vivid colors.
- Color Options: If your design uses multiple colors, set the color output to ‘Color’ instead of monochrome.
This ensures that all elements of your design are accurately represented in the final print.
5. Print a Test Page
Before committing to the final print, always do a test run:
- Select a Small Section: Print a small portion of your design to gauge its quality. This enables you to evaluate the colors and overall aesthetics without using excessive resources.
- Assess Quality: Examine the test print for color accuracy, detailing, and alignment. Take note of any adjustments needed in the design before proceeding.
- Make Adjustments: If elements seem off, return to the design software and make necessary tweaks, such as modifying color saturation or repositioning graphic components, to better align with your vision.
6. Final Print
Once you are happy with the test print, it’s time for the final version:
- Double-Check Settings: Ensure that all printer settings are correctly configured, especially the quality and paper type. This final review helps avoid any mistakes at this critical step.
- Press Print: Click to send your design to the printer. Ensure no interruptions occur while the printer is in operation to minimize the risk of errors.
- Wait for Completion: Allow the printer to finish its job without interference. Patience here can result in a more polished final product.
7. Let It Cool
Post-printing care can prevent damage:
- Cooling Time: Allow the prints to rest for a few moments. This cooling period is crucial to set the toner properly and avoid smudging. If handled too quickly, the prints may lose quality.
- Inspect Prints: Take a careful look at your final product for any imperfection. Examine edges, colors, and overall quality. If there are issues, note them for future prints.
Additional Tips for Laser Printing Success
- Use High-Quality Toner: Invest in original or trusted toner cartridges to avoid low-quality prints that might fade quickly or have uneven application. Quality toner better adheres to your prints and contributes to the longevity of the colors.
- Regular Maintenance: Keep the printer clean by dusting off components and regularly checking for toner spills or paper dust. Cleaning the printer reduces the risk of common printing issues, ensuring that your outputs maintain a professional look.
- Experiment with Settings: Each project may require unique settings. Don’t hesitate to explore different resolutions and color modifications to discover the best combination for each piece. Adjusting settings based on the type of project can enhance results significantly.
- Store Prints Properly: After printing, keep your works in a cool, dry air to avoid warping or discoloration. A protective folder can also prevent scratches or bending during storage. Proper care ensures that all your efforts in design and printing are preserved effectively.
- Track Your Supplies: Maintain an inventory of toner and paper stock to avoid running out during critical projects. Regularly check levels to ensure uninterrupted work and gather supplies ahead of time for larger printing tasks.
- Test Different Paper Brands: Not all papers are created equal; experiment with different brands to find which gives you the best results. Some brands may have unique coatings or surfaces that enhance color brightness or reduce smearing.
Conclusion
With these steps and tips outlined in this article, you are now equipped with a good knowledge on how to create stunning print using a laser printer. All you have to do is get your materials set, and add your creativity. If you have more concerns, or need professional help with laser printing contact Twincarrot.